Sep 05, 2017 08:30 am / Posted by Diana Joan | Categories: NAS
DiskStation DS1517+, the new Synology NAS, which has expanded the storage from 50TB to a maximum of 150TB using 15 drives via two DX517 expansion units. For your multiple DVD discs, no doubt, this NAS provides the best storage space. You don’t worry about the DVD storage space, various DVD disc protection tips. You just need the DVD Ripper and convert DVD to digital video formats, then upload the video files to DiskStation DS1517+ NAS for playback.
Maybe it sounds so easy, actually, you will be in trouble when you are selecting the DVD ripper, there are 50+ DVD ripper on the internet, some are free, some are not, some are online DVD rippers, some are professional DVD rippers, etc. They all do the remarkable ads and claim to ro rip and convert DVD to your desired video files, choosing one? You can refer to this post and steps, maybe you can find the best DVD Ripper for DS1517+ luckily.
Irreplaceable DVD Ripper for DiskStation DS1517+ NAS
When you meet this DVD ripper, you may find MakeMKV and Handbrake is not the best option, who is the hero? Bytecopy for Mac is the software we are searching which can be the irreplaceable DVD Ripper, you may love the user-friendly interface, easy and powerful buttons, multiple video formats, fast video conversion speed, high stability, etc. In a word, this software won’t let you down. (Best DVD Ripper review)
Key Features You Can Get in Bytecopy
- Remove the most DVD copy protection: CSS, RC, RCE, APS, UOPs and Sony ARccOS, Disney DVDs,and so on.
- Support the DVD disc, DVD ISO/IFO image and folder import, even including the Blu-ray disc and images.
- Output multiple vidoe formats, about 300+, like: H.264, H.265, MP4, WMV, MKV, MOV, AVI, FLV, etc.
- Backup full DVD disc or DVD main title with fast speed.
- Perfevt 3D vidoe converter: getting 3D video from common DVD videos.
- Upscale common DVD video to 4K video without much quality loss.
Get the best DVD ripper: 

How to Rip and Convert DVD to DiskStation DS1517+ NAS
Basic Work Flow: Insert DVD disc&Open Software —-> Choose DVD Copy Mode(A: copy full DVD disc | B: copy DVD main title | C: Get digital DVD videos) —–> Start DVD Copy Process —-> Upload DVD to DS1517+ NAS
Step 1. Load the DVD disc
Open this software, and click File and choose Load files button to import DVD videos directly from your disc. You can drag the DVD movie to the DVD ripper software directly. When you load the DVD disc, this software can detect the DVD main title automatically.
Tip: You can also load DVD ISO/IFO image to it and select the chapters you want to copy. At the main interface, you can choose to output the video with forced subtitles and decide the forced subtitle language.

Step 2. Copy DVD to DiskStation DS1517+ NAS
Otion A: Just click ![]() on the top of this software, this button will help you to copy the whole DVD with all the DVD content, like: video chapters, subtitle, audio tracks, menu and navigation contents and so on.
on the top of this software, this button will help you to copy the whole DVD with all the DVD content, like: video chapters, subtitle, audio tracks, menu and navigation contents and so on.
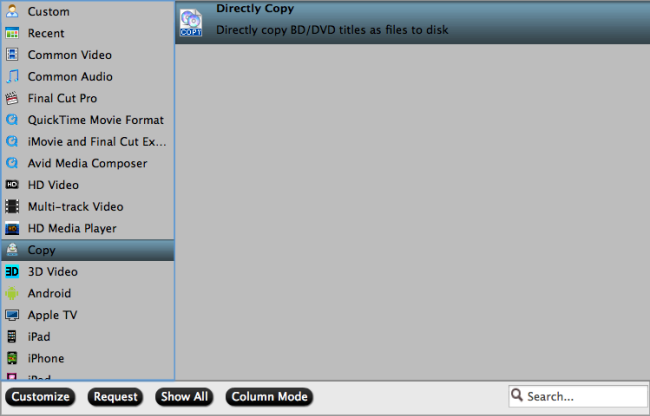
Option B: When you want to copy the DVD main title which can save many space on your hard drive. Navigate to “Format” > “Copy” > “Directly Copy”
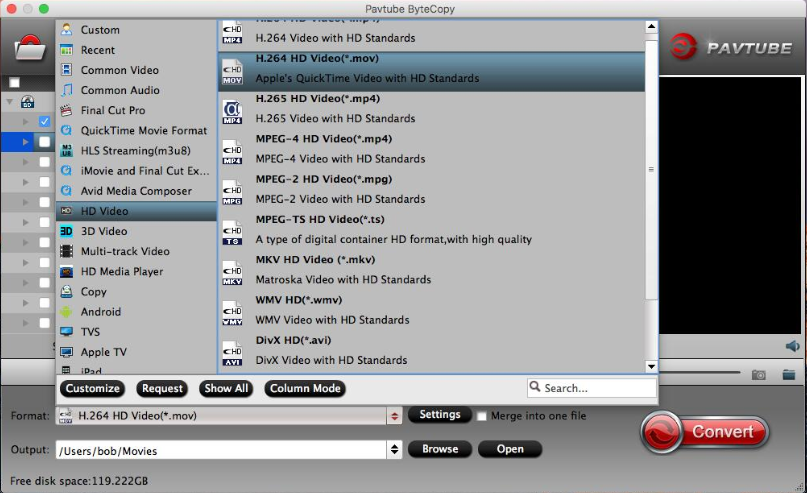
Option C: Click Format button and open the output video list, you can find 300+ video formats at here, like: MP4, H.264, H.265, MOV, AVI, MKV, WMV, MPEG-2, etc.etc. You can choose any video formats you need, friendly suggestion: You can choose multi-track MKV video format which can keep the video subtitles, chapters, multi-tracks.
Step 3. Start DVD video conversion
After choosing the DVD copy mode, go back to the main interface and click Convert button, this DVD ripper will complete this hard process and provide you the perfect digital DVD video files, Then you can upload the DVD videos to DS1517+ NAS, you can stream the converted DVD videos to PS4 Pro, Xbox one, iPad, iPhone, TVs by Plex, Kodi or other media service.
Friendly Tips: Setup the DS1517+ NAS in 10 minutes
| Step 1 | Step 2 | Step 3 |
|
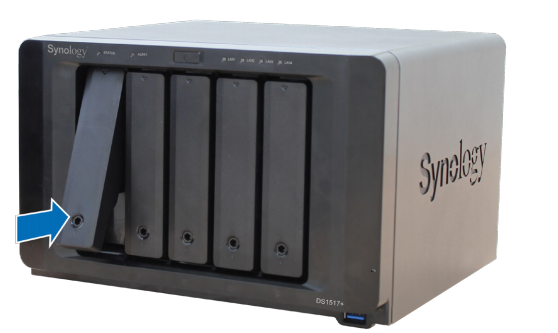
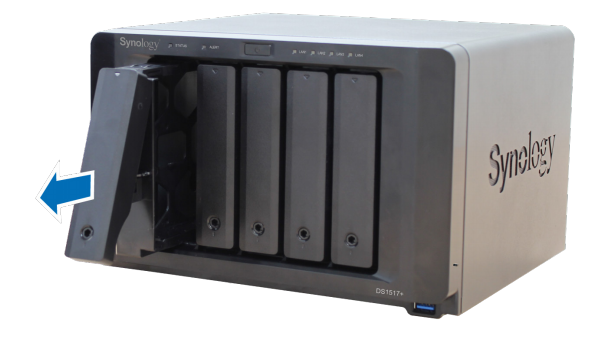
Press the lower part of the hard drive tray to pop out the handle. |
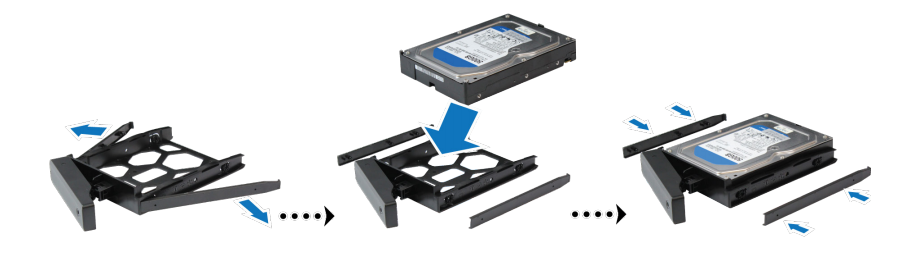
Pull the hard drive tray handle in the direction as indicated below to remove the hard drive tray | Load drives in the drive trays: Place the drive in the drive tray. Then tighten the screws to secure the drive in place. |
 |
 |
 |
| Step 4 | Step 5 | Step 6 |
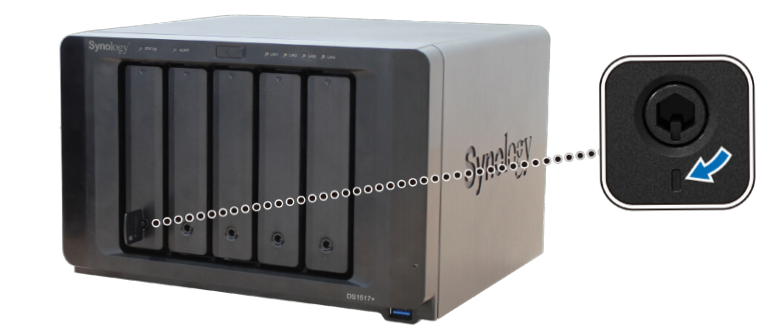
| Insert the loaded hard drive tray into the empty hard drive bay | Insert the hard drive tray key into the hard drive tray lock, turn the key clockwise (to the “I” position) to lock the handle of the hard drive tray, and then remove the key. |
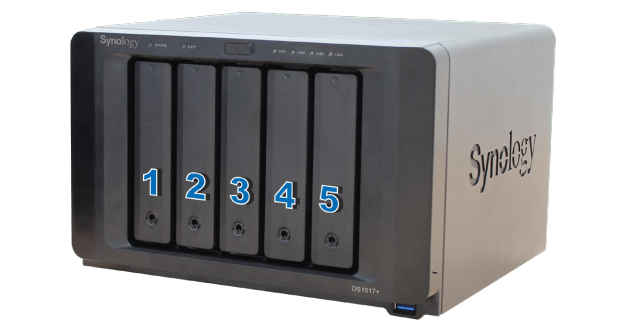
Repeat the steps above to assemble the other drives you have prepared. |
|
 |
 |
Thank you for your time, I hope this post and DVD ripper is helpful for you, you can manage your multiple DVD discs well by the DS1517+ NAS.
Related Articles
Hot Articles & Reviews
- Connect Synology NAS to Kodi via Network File Sharing
- Install Plex Media Server on FreeNAS for Media Streaming
- Difference between Synology NAS and QNAP NAS
- Use QNAP NAS on TV Via HD Station and Kodi Application
- Tutorial: Master Your Plex Media Server with a QNAP NAS
Any Product-related questions?