


Competing with Microsoft’s Xbox and Sony’s PlayStation, the Wii U and Wii are also home video game consoles released by Nintendo. However, until now, there are many “DVD not playing on Wii-U/Wii” issues reported by moviegoers at GameFAQs, IGN Boards, Wii U Forum, etc.

Can Wii U/Wii play DVDs?
If you were hoping your Wii U or Wii would double as a DVD player in living room, you’re out of luck. Disappointedly, according to Wii U FAQ, neither the Wii console, nor the new Wii U will play DVD discs. The reason for that is that Nintendo feels that enough people already have devices that are capable of playing DVDs, such that it didn’t warrant the cost involved to build that functionality into the Wii U/Wii console because of the patents related to those technologies. Don’t worry. You can still play the wonderful DVD video content on Wii U and Wii by using this two easy methords below.
Method 1. Hack Wii for Homebrew Apps and DVD Playback
To play DVD on Wii through Homebrew Channel, you need to install a small and hidden Homebrew channel on a system. This package blesses the console with a libdi file (DVD access library), and allows you to watch your favorite videos with the MPlayer application.
Requirements:
- Nintendo Wii (with system version 3.2)
- A FAT/FAT32 formatted SD card (2GB and below)
- A SD card reader/writer
- The Legend of Zelda: Twilight Princess for Wii
- The Twilight Hack (which is compatible with Homebrew Channel Installer)
- Homebrew Channel Installer
- DVDX: this app enables Wii to read DVDs once inserted in the drive
- Media player that is enabled to play commercial DVDs (MPlayer)
How to Achieve to Play DVD on Wii via Homebrew Channel
It is important to note that there are two essential steps that need to be carried in order to successfully play DVDs in Wii. These processes include installation of the Homebrew Channel as well as the DVD player.
Step 1. Install the Homebrew Channel
- Slot in your SD card into your reader after which you will have to copy the “private” directory of the Twilight Hack onto your SD card. Though many people tend to forget to do it is important that you remember to also copy “boot.dol” file that belongs to Homebrew Channel.
- Insert the SD card into your Wii after which you will be required to delete the Zelda save file which is found in the Wii File Manager
- There are two versions of Zelda (RVL-RZDE-0A-0″ or “RVL-RZDE-0A-2) that you will insert however you have to choose one of these versions depending on the required or correct hack. For instance, RVL-RZDE-0A-0 is compatible with TwilightHack0 while RVL-RZDE-0A-2 necessitates for TwilightHack2, which are both available in the package.
- Go to your file manager and switch to SD view after, which you will be required to copy the correct version of the hack.
- Insert the Zelda game disk, start the game, and save the game. Once the homebrew Channel installer starts, it is time to feel free to enjoy your favorite DVD movies with less or no limitations. Complete the process, after which you will be in a position to access the Homebrew Channel just like any other program on your Wii.
Step 2. Install the DVD Playback Software
- After a successful installation of the homebrew channel, it is time to install a third party DVD player (MPlayer). This third party DVD player will enable you to play DVDs on your Wii console.
- First things first, all you need is to find a safe place where you can install and then Copy the third party DVD player (MPlayer) into your SD card.
- Insert your SD card into your Wii and start the homebrew channel that will give you access to the two apps you present in your SD card. After which you will run the DVDX installer app. Select “Normal Installation”. Normal Installation will ensure that the installation runs smoothly with minimum or zero problems.
- After a complete installation, insert your DVD into your Wii and start the MPlayer app. This way you will be able to play the DVD from the MPlayer menu.
Step 3. Play DVD on your Wii MPlayer menu
- Go into The Homebrew Channel. Select -> MPlayer
- Select DVD-Video select -> Title
- Then Play DVD
See how it works in the video tutorial:
The good:
Once installed, you can then pop into the MPlayer app from the Homebrew Channel, put a video DVD in the drive, and your favorite video will be right in front of you in no time.
The bad:
You have to download a homebrew video player, copy them to an SD card, and use the Homebrew Channel to apply a two-second patch. And you have to take note that there’s a corresponding risk on the Wii if you do something wrong. Worse still, the process is somewhat complex which might be a challenge for people not that familiar with computer skills.
Method 2. Rip DVD to optimized Wii U/Wii video format
Don’t want to attempt some complicated hack that messes with your Wii’s guts? You are suggested to have shot on the safer method – rip DVD and play DVD movie on Wii U/Wii with friendly video format. It will surely liberate yourself from endless annoying predicament. Below is a dead easy solution to get DVD Wii U/Wii problem worked out.
1. Hardware Requirement:
Wii equips a DVD drive, the preset app “Photo Channel” can play AVI/MOV video with MJPEG format.
Wii-U equips a modified Blu-ray drive, there is a “hidden function” to stream MP4 video from computer to Wii-U.
Wii could play DVDs and WiiU can play Blurays with the disc drive. However, they won’t actually read your movies because the programing, it will only read Wii games and WiiU games. So no hardware is required if you ripped video of your DVD.
2. Software Requirement:
With the help of a professional DVD ripper for Wii U/Wii- Pavtube ByteCopy, you are able to copy and rip both non-protected and commercial DVDs to Wii U/Wii-accepted format in one stop with high quality and fast speed in customized video size. (Read review)
Key Functions:
- Various discs/disc image are supported including protected DVD folder, DVD disc, DVD ISO, DVD IFO or Blu-ray (disc/folder/ISO) including The Revenant
- Easy conversion way and high output quality
- 6X fasted speed – Rip DVD in minutes
- Supports 250+ video, audio output formats and devices, therefore, you can directly rip DVD to PS3, Xbox 360, TV, iPhone 6S/SE/6S Plus, iPad Air 2/, Mini 4, iPad Pro, Sony Xperia Z6 Compact, Samsung Galaxy S7/Note 5, HTC One M9, Kindle Fire HD, as well as other new phones and tablets even released in 2016.
- DVD to 3D conversion: Create 3D videos from DVD to play on 3D Players, Gear VR, VR One, Rift DK2, etc.
- Rip DVD (ISO) to Mult-track videos including lossless DVD copying and DVD to Multi-track MP4/MOV/AVI ripping
- DVD movie capturing: While previewing DVD movie, you can capture your favorite picture to save it
- Editing function: It provides full editing functions of trimming, cropping, watermark/subtitle adding.
- Real-time preview: While you edit DVD, you can view the effect of converted file to get perfect videos
- Output settings: Not only the default but more settings to customize: bit rate, resolution, frame rate, sample rate, ect
- Supports ripping DVD with forced subtitle and desired subtitle/audio tracks
- Easy operation: You can easily finish the converting DVD only with a few clicks
- Perfect Support: You can free upgrade the products through all your life and you are provided email support service to solve your problems immediately.
System Requirements
Processor: Intel or AMD Dual core CPU, 1.6 MHz at least
Operating System: Windows 2003/XP/Vista/Windows 7/Windows 8/Windows 8.1/Windows 10
Memory: 512MB or above
Display resolution: 1024 x 768 or above
Optical Drive: DVD drive
For Mac users, Pavtube ByteCopy for Mac is you best choice.
Pay attention to the converted file size:
Wii has a poor support for a video larger than 2 GB. Therefore, when you rip & convert a DVD movie to AVI/MOV video, please lower down the quality to control the file size.
With the Wii-U, we cannot save a video file in the SD Card then play it on the device, instead, we need to stream the video file to Wii-U and play it.
Below is the detailed procedures on how to rip DVD to Wii U/Wii supported format for playback. And the screenshots are taken from the Windows version of ByteCopy. Please download the suitable version to your computer.


Other Download:
– Pavtube old official address: http://www.pavtube.cn/bytecopy/
– Cnet Download: http://download.cnet.com/Pavtube-ByteCopy/3000-7970_4-76158512.html
How to Rip DVD and Play DVD on Wii U/Wii
Step 1: Load source DVD disc
Insert DVD disc into the DVD-ROM. After you download and install this DVD software on your PC, launch it. On the home interface, click the disc icon to import your DVD movies. This DVD ripper allows users to set subtitles for easy enjoying.

Step 2: Select the output format
Click on the dropdown menu of “Format” and then move your pointer to “Wii”. From the sub-list, you can choose “Wii AVI Video (*.avi)”, “Wii MOV Video (*.mov)” as the target format for your Wii. For Wii U, you can select “H.264 High Profile Video(*.mp4)” or “H.264 HD Video(*.mp4)” from “Common Video” and “HD Video”.
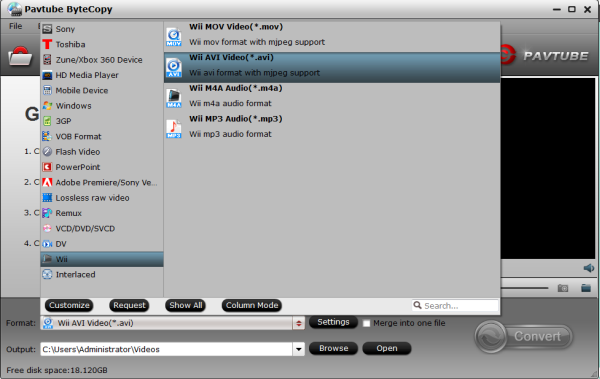
Tip If the default video/parameters can’t meet your needs, just click Settings icon to adjust the video codec, bitrate, frame rate, audio sample rate, etc to get a decent video as you want. In principle, the larger input values, the better output quality, but the corresponding larger file size. Keep in mind that Wii has 2GB restriction.
Step 3: Start DVD to Wii U/Wii conversion
After all necessary settings, you can hit the “Start conversion” to start converting DVD with best video settings for Wii U and Wii. Once the conversion finished, click “Open” in main interface to quick locate the converted video. Then, you can transfer or stream the converted movies to play with Wii (U). Just enjoy.
3 ways to Play converted videos on Wii U/Wii
1. Play the video in Wii by Photo Channel
Now getting a SD card, you can just use the SD card plugged in Wii. Reading the card on your computer and find the folder which saves the photos, and copy the AVI or MOV video into the folder. After that, insert the SD card back to Wii.
Turn on Wii and go to “Photo Channel”, when the Wii asks you which photos to view, please choose “Digital Camera/Cell Phone (only SD Cards are compatible)”.
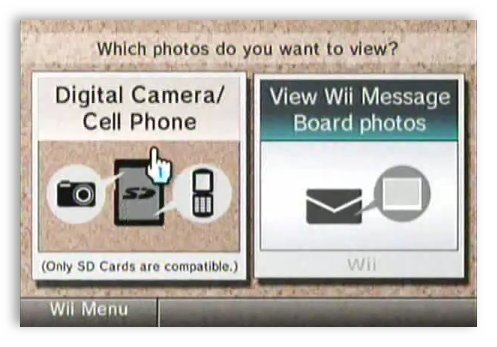
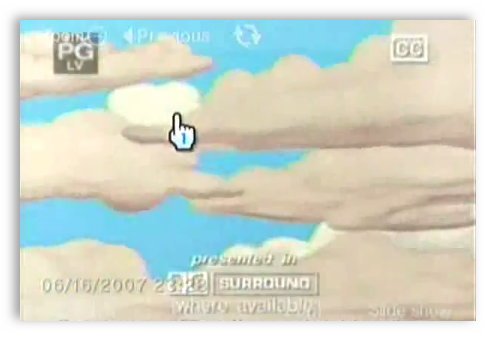
After that, Wii will tell you how many photos and videos are found, click “View” to check the photo and video library, now you can click on a video to play.
2. Copy the file(s) to your SD Card & Play it on Wii!
a. Connect Wii to TV with AV cable
Insert the colored connectors on the Wii AV Cable into the input connectors on the TV. Plug the colored connectors into the following inputs:
Yellow: Video Input
White: Audio Input Left (or Mono)
Red: Audio Input Right
b. Insert the SD card to Wii
Insert the SD card into the SD Card slot on the front of the Wii console and now you are ready to freely enjoy the Blu-ray movie on Wii.
Here are some of the Nintendo’s SD Card Resources:
List of Compatible SD Cards – You’ll be able to find details on the different SD cards as well as guides on how to load contents from the SD card.
Using Your Wii’s SD Card Menu – Pick up a few trips on how you can copy or save data to the SD card.
Wii SD Card Troubleshooting – Find help on troubleshooting; for instance with the error message, controller, systems and much more.
3. Stream the converted video from computer to Wii-U
The process for streaming videos is not as simple as just firing up the Wii U web browser. First you’ll need to set up a local web server on your PC. This can be done with Windows by taking the following steps.
- Go to Control Panel, and then click on Programs. You’ll see a link for “Turn Windows features on or off”. Click that.
- Scroll down until you see Internet Information Service and expand that.
- Click the boxes next to Web Management Tools and World Wide Services to enable both and then click OK.
- Now go to Control Panel and then Administrative Tools. You should see Internet Information Services (IIS) Manager listed. Open that.
- You should see your PC listed in the left panel. Expand that until you see Sites -> Default Web Site.
- Right-click on Default Web Site to bring up a menu and go to Manage Web Sites -> Advance Settings.
- Change the Physical Path in the Advanced Settings to the folder that is holding your avi video files and click OK.
- Now double-click on the MIME Types icon on the IIS Manager screen. If mp4 is not listed, click Add in the right panel.
- Enter “.mp4” for the File Type Extension and “Video/mp4” for the Mime Type and then click OK.
- Go back to the IIS Manager screen and double-click on Directory Browsing.
- In right panel of the Directory Browsing screen, click Enable.
With that done, you can now use the Wii U web browser to directly browse to your PC’s IP address and play mp4 videos. If you don’t know your PC’s ip address follow these directions.
- Click the Start menu and enter “cmd” into the “Search programs and files” text box.
- Type “ipconfig” in the command prompt and hit enter.
- Your PC’s IP address will be displayed.
- Enter that IP address in your Wii U web browser
Mac and Linux directions on setting up a local web server can be found by searching Google or Bing for “Mac web server setup” or “Linux web server setup”.
The theory is not complex, you need to turn your computer to a local server, and use your Wii-U’s web browser to stream the video from your computer. Since some steps would be difficult to understand, I searched a video for you as below:
Related Articles
Hot Articles & Reviews
- Best Free Blu-ray Ripper Review
- Best 4K Blu-ray Ripper
- Best 5 Blu-ray Ripper for 2017
- Which Blu-ray Ripper You Should Get?
- Best 4K Blu-ray Ripper Review
Any Product-related questions?


Leave a reply