


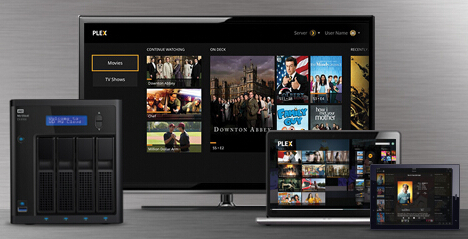
Many people prefer to rip Blu-ray to Plex so that they can stream Blu-ray movies with Plex on ATV, Roku, PS4, etc. Considering the large space need to store the large Blu-ray rips, NAS is an ideal choice. My Cloud EX4 is a member in MY Cloud family which can stream media stored on your My Cloud NAS to all your devices, such as your PC and Mac computers, smartphones, tablets, Smart TV and more. Here the article is devoted to teaching you how to backup Blu-ray in order to play Blu-ray movies with Plex via My Cloud EX4.
Get prepared
a PC or Mac
External Blu-ray drive if your computer doesn’t have one
A Blu-ray Ripper
Your Blu-ray discs
Before started
Since Blu-ray Ripper is not a frequently-used tool, many people maybe don’t have one until they need to rip Blu-ray to Plex for WD My Cloud EX4 today. I recommend top-ranked one to you – Pavtube BDMagic with the below function:
– Convert any commercial Blu-ray disc, Blu-ray ISO, Blu-ray folder to Plex supported format to store in WD My Cloud EX4.
– Adjust A/V size, codec, bitrate, channel, etc and display aspect ratio.
– Built-in editor to trim/crop video, add subtitle/watermark, remove audio, deinterlace video, etc.
– Batch conversion and GPU acceleration
Learn other choices >> Top 5 Blu-ray Ripper Reviews
Free download and install:


Start to rip Blu-ray to Plex and WD My Cloud EX4
Step 1: Download and install Blu-ray to Plex/MY Cloud EX4 converter and launch it. Click “File” to add Blu-ray movie to the software. You can select your desired subtitle/audio track below chapter list.
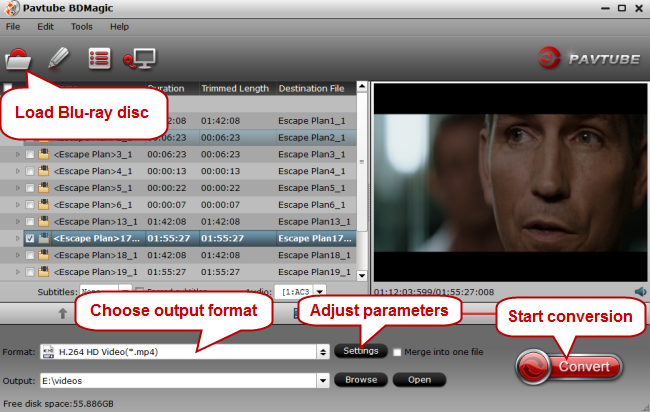
Step 2: Tap on the “Format” bar, from its drop-down list, select “Plex” best playable file format by following “HD Video” > “H.264 HD Video”.
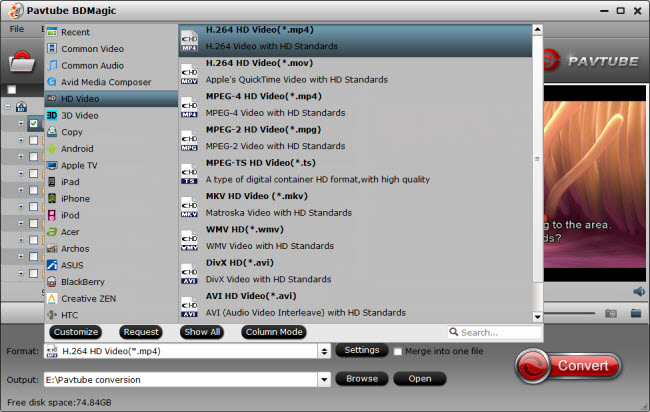
Tip: To get satisfying video playback effect with Plex Media Server, you can adjust the output profile parameters such as video codec, size, bit rate, frame rate and audio codec, bit rate, sample rate and channels.
Step 3: Go back to the main interface, hit right-bottom “Convert” button to start to backup Blu-ray for playing with Plex via My Cloud EX4.
Installing the Plex App on WD My Cloud EX4
1. From the main page of the Dashboard, click the Apps button of the Navigation bar. For assistance accessing the Dashboard, please see Answer ID 10420: How to access the Dashboard on a My Cloud.

2. Under the left-side panel, click the Add App icon.

3. From the list of available Apps for the unit, scroll down and select Plex by checking the check-box to the left of it, then click on Install.

4. Plex will download and install. This process may take a few seconds.
5.Once Plex has been installed on the Cloud Storage or Network Attached Storage, click on Plex Media Server and then Configure.
6. Sign in or sign up to set up your Plex Media Server.
Configuring the Plex App on My Cloud EX4
1. Once Plex is ON, the Configure button will be displayed. Click on it to access the application’s interface.

2.Once inside the app’s interface, Sign Inif you have an account already or Sign Up to create a new account.
3.After login in to your account, you should see either several media files if the account was set up previously set up or no media files if recently created. To add media files to the account, click on the + icon towards the left (next to the name of the drive).
4. Then select the library type, give your library a name, and choose your language. Once done, click Next to continue the setup.
5. Click on Browse For Media Folder to select the folder in which the media content is located.
On the list to the right, select the Shares folder.
6. On the list to the right, select the Shares folder.
7. Here is where the default (such as the Public, Smartware, and TimeMachineBackup shares) and the created shares are located. Locate the share where the media content is found and click Add.
8. You can add another share location by clicking on Browse For Media Folder again and selecting the share. Once finished, click on Add Library and the Plex media server will start to populate the media content.
Note: When populating, depending on how many media files are located on the chosen shares, it may take several minutes to several hours.
Playing Media Content
1.Once the media content has populated, you can view a list and select which file you would like to play.
2.When selecting a media content, click on the play button above the name of the file when hovering your mouse over the picture or black rectangle.
3. You should now be able to see the content playing once it has loaded.
Applied Products:
My Cloud Mirror
My Cloud EX4
My Cloud EX2
My Cloud DL4100
My Cloud DL2100
My Cloud EX2100
My Cloud EX4100
Related Articles
Hot Articles & Reviews
- Top 3 DVD Movie Subtitle Editors
- Best DVD to MP4 Converter Review
- Top 5 Best Free DVD Ripper
- Top 10 Free DVD Ripper Reviews
- Top 3 DVD to MKV Rippers for MacOS Sierra
Any Product-related questions?


Leave a reply