


Jun 12, 2014 07:15 am / Posted by Diana Joan | Categories:
Overview | Guide | Tech Spec | Review
Full Guide: How to Rip, Convert, Edit DVD Videos for watching
As a professional and powerful tool, Pavtube DVDAid can help users to rip DVD movies for play on any portable media device, application or HD media players. With it, you can rip DVD discs and convert DVD ISO/IFO image files and DVD Folder to AVI, MPEG, MKV, WMV, FlV, MOV, MP4, 3GP, 3GPP, MPG, ASF, VOB, WMA, M4A, MP3, etc. and edit the DVD videos as you like for watching on any popular media players.
Quick Start:
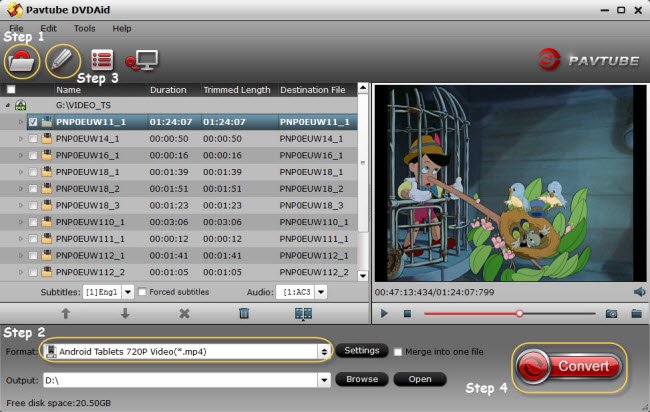
Step 1: Add DVD movies
Insert your DVD disc into your computer’s DVD-Rom, start up DVDAid and click the “Load Disc” icon to begin uploading files. You can also convert DVD without the disc, using ISO files, or DVD Folder. After the DVD files are loaded, you can preview them on the right viewing window and take snapshots of your favorite movie scene.
Spet 2. Select an Export Format and Destination Folder
Click “Format” bar and select the format you want from the drop-down list. Just below Format is Output, here you can browse your computer for a better destination folder for DVDAid to output your converted movies.
If you like, you can click “Settings” to change the video encoder, resolution, frame rate, etc. as you wish.
Spet 3. Edit video files
From the Edit menu you can choose six distinct editing workspaces; Trim, Crop, Text Watermark, Image/Video Watermark, Effect, and Audio Replace.
- Trim: Allowing users to decide where to start and where to end when converting the selected clip, so that unwanted segments will be cut out after conversion.
- Crop: Getting rid of the black edges and unwanted area of the image.
- Text Watermark: Here, you can create a text watermark to personalize your video. For a text watermark, select the “Enable” box below the preview screen and type whatever text you want in the text watermark area.. You may strikeout, underline and transparent effect for the text. The font, color, size, and style of the text can be adjusted too. Click “Apply to All” to apply the settings to all the videos that are listed in file list.
- Image/ Video Watermark: Here, you can import an image or video watermark to personalize your video.
- Effect: Customize the output effect. Here, you can adjust brightness, contrast and saturation, apply gray, flip color, invert or Aged film effects and apply a number of deinterlacing options.
- Audio Editor: Adding audio to target video file so that you can replace the original audio track with favorite melody.
Spet 4. Start converting
Press “Convert” button to rip DVD movies. After conversion, you can transfer the converted files to for personal use. Now that you’ve liberated your DVD movies!
Leave a reply