Dec 08, 2014 08:24 am / Posted by Diana Joan | Categories: Alternative, Video Tools
1. Download HandBrake 0.10.0
The final build for 2014 new HandBrake 0.10.0 is almost there and HandBrake 0.10.0 beta 4 now is available for download, giving all users the opportunity to find out bugs so that the developers can work out all the issues. Now we will do the HandBrake 0.10.0 ripping Blu-ray to H.264 MP4 test.
Before testing, download new beta of HandBrake 0.10.0 for Windows or Mac here. Note: Windows XP is no longer supported.
HandBrake 0.10.0 for Mac (For Mac OS X 10.6 – 10.9): Download (Intel 64bit)
HandBrake 0.10.0 for Windows (For Windows Vista, 7 and 8.x): Download (64 bit); Download (32 bit)

2. HandBrake 0.10.0 Blu-ray to H.264 MP4 Test
Learn how to create a high definition 1080p MP4 file with H.264 video from Blu-ray with the best quality/size ratio possible in this guide using new HandBrake 0.10.0.
Step 1
Before starting the encoding process with Handbrake you need to use an unlocking software to circumvent the Blu-ray’s protection. I really suggest you let Pavtube BDMagic <review>do that job. You can download it here. Besides just running BDMagic in the background, a good idea would be to rip the whole disc to the hard drive first. Read this guide to find out how you can do that.
Can WD TV Live Plus play Blu-ray backup (ISO/BDMV/M2TS/MKV)?
Backup DVD/Blu-ray discs to hard drive on Mac losslessly
Step 2
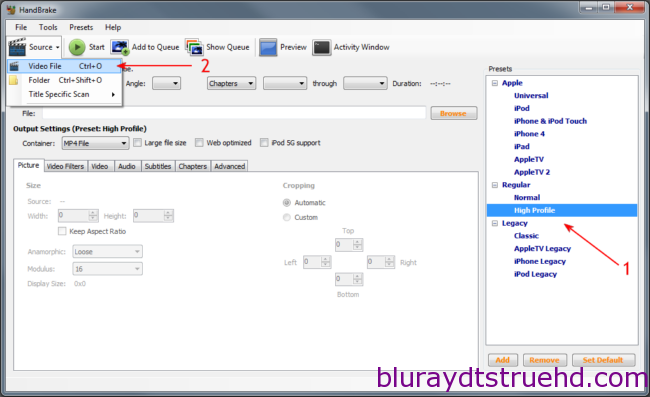
Open up Handbrake. Make sure the High Profile (1) is selected and then select Source -> Video File (2).
Step 3
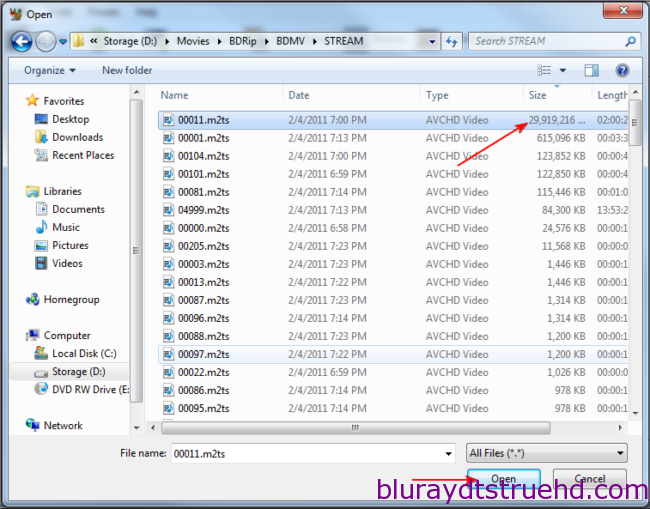
Browse to the BDMV folder of your Blu-ray disc and inside the STREAM folder select the biggest m2ts file and click Open. Unfortunately Handbrake does not support seamless branching Blu-rays yet so if you don’t have just one big m2ts file follow this guide to demux your Blu-ray disc manually and remux it in an mkv file. Then import the mkv file and follow the rest of this guide.
Step 4
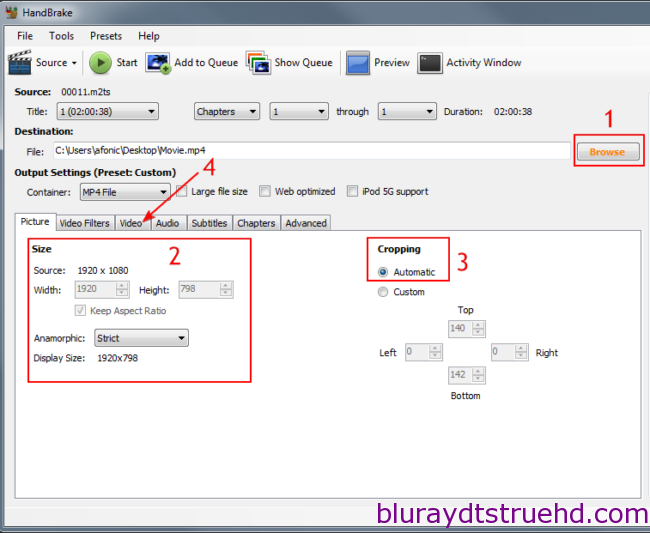
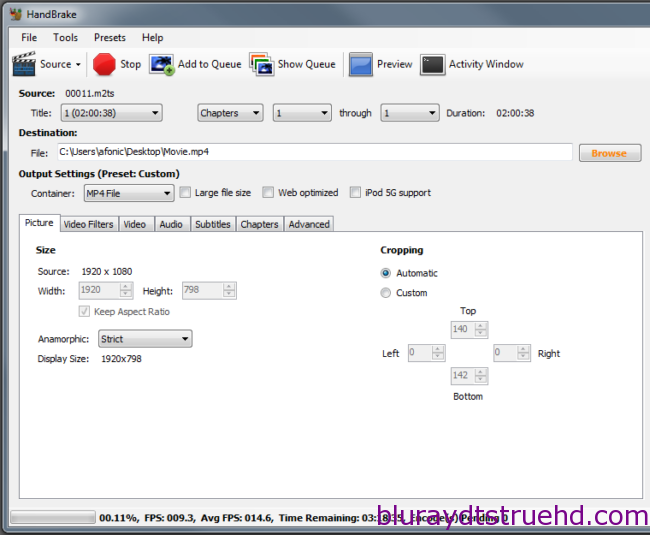
With the movie loaded it is time to set the output file by clicking Browse (1). The MP4 container should be already selected. Now in the picture tab (2) you can set the output size. In this example we are keeping the full resolution so we selected Strict anamorphic. If you want to downscale to 720p selectLoose in the anamorphic setting, set the Modulus to 2 and manually set the width to 1280. Cropping should be set to Automatic (3) in order to remove the black bars from the movie. Do not worry about the 1920×798 resolution in this example, the movie is 1080p quality-wise, we just got rid of the black bars by cropping them. Open the Video (4) tab and move to the next step.
Step 5
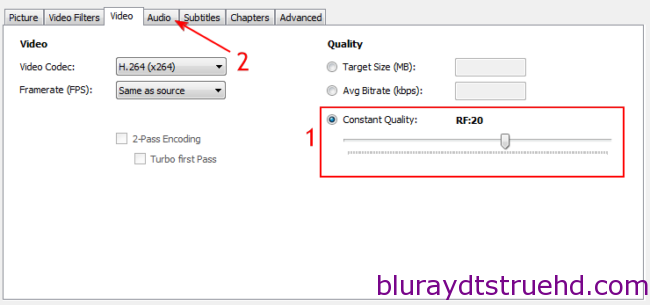
The codec we will use is of course H.264. Now a few words about the settings here. In this example I will use constant quality (1) with a 20 value. Constant quality is a faster encoding method than the traditional 2-pass option and tries to keep a constant quality on all your files, regardless of the movie lenght or content. That however means that you cannot know how big the file will be as it depends on the movie length, the CQ setting and the actual content. Usual values range from 18 to 26, with 18 being the “best” and 26 the “worse” quality. I am using this option for my mkv backups as I prefer to base my encoding on video quality and not file size.
Of course, you can always select the 2-pass option by setting a Target Size and enable 2-Pass Encoding. The Turbo first pass option will help you save some time without a slight decrease on quality so if you want to encode faster, select it as well. I suggest you give at least 4GB to your file if you are using 1080p and at least 2GB for 720p. If you go over 4GB select Large file size next to the MP4 container option. Now click the Audio (2) tab.
Step 6
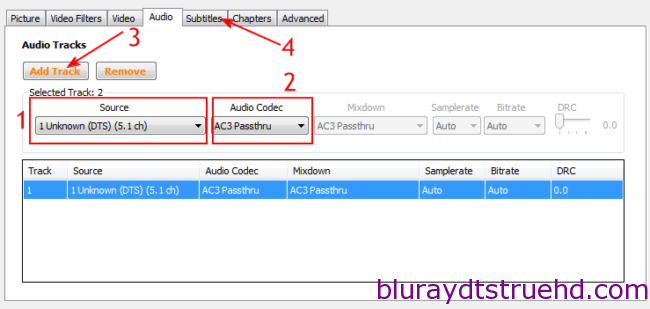
Here you have to select the audio track you want to add in the MP4 file (1). Selecting AC3 Passthru (2)will actually make an AC3 track off your DTS audio as DTS is not supported by the MP4 format. You can also downmix to stereo AAC using Dolby Pro Logic II. You can preserve you DTS audio by using the MKV container instead of MP4 and Handbrake will copy the Core stream for you if you select DTS Passthru (not available when using MP4). Learn more about the DTS-HD audio in Blu-ray discs here and about Handbrake’s audio options here.
Make sure you click Add track (3) after selecting the right track and settings and that it appears in the list below. Then click Subtitles (4).
Step 7
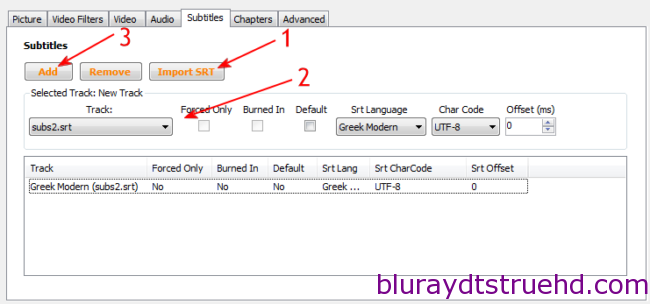
Here you can add subtitle streams in your MP4 file. Unfortunately Handbrake does not support processing Blu-ray subs, so you keep to have them in SRT format. If you do, import them (1) and then after setting the language (2) and if you want them to appear by default, click add (3) to add them to the list below.
Step 8
That’s all. Just click the Start button at the top and a few hours later you will have a HD MP4 file.
If you have problems you can use the comments form below in order to ask any question you may have. You can also check the rest of the Blu-ray rip guides here.Some drawbacks of HandBrake as a Blu-ray Ripper:
1. HandBrake loads and converts slow. For faster converting speed, a Blu-ray ripper shareware is better choice. If your computer has an Nvidia CUDA graphics card, a CUDA-compliant Blu-ray Ripper could save a lot of time for you.
2. HandBrake exports .mp4, .m4v and .mkv format only. If you’d like to rip Blu-ray to .mp4, .avi, .wmv format, choose a Blu-ray movie transcoder instead.
3. You get a set of video streams instead of a full-length movie in one file only. This has something to do with Blu-ray file system.
4. Although Handbrake has added some support for Blu-ray ripping, it doesn’t handle commercial copy-protected Blu-ray Discs nor decrypted commercial Blu-ray movies in BDMV file structure.
Rip DVD to iTunes 12/11 with Ha?ndbrake Alternative
Handbrake rips DVD to m4v format, not mp4?
Handbrake Alternative to Rip All Protected Blu-ray and DVD to iPhone, iPad, Android
If you can not bear the complexity of install third-party software to assist Handbrake rip Blu-ray, or you just need faster and more convinient Blu-ray ripping solution, then here is an alternative for Handbrake 0.10.0 – Pavtube BDMagic which is updated to perfectly rip and backup all protected movie discs, then to iPhone (6/5/4), iPad (Air 2/mini 3), iPod, iPod touch and Apple TV. Meanwhile, it still gives breakthrough performance to convert Hollywood like Disney DVD movies, Bollywood movies for playback on iPhone, iPad, Android etc. The mac version is BDMagic for Mac. Enjoy this test and tutorial.
Related Articles
Hot Articles & Reviews
- Best Handbrake Alternatives
- WinX DVD Ripper Best Alternatives
- Best Alternative to DVD Decrypter
- K-Lite Codec Pack Alternatives
- Best Alternative to Magic DVD Ripper
Any Product-related questions?