Jun 05, 2015 01:13 am / Posted by Diana Joan | Categories: BD/DVD Tools
How do I keep forced subtitles when converting Blu-ray movies?
I just finished converting a bunch of movies from Blu-ray and I just realized now I lost all the forced subtitles (for example: subtitles that translate fictional languages) for everything. Any advice moving forward on how to not lose these subtitles when converting my Blu-rays?
Forced subtitle is the subtitle appearing on screen when the characters speak a foreign or alien language, or there is a sign, location, or other text in a scene which needs to be explained but cannot be translated in the localization or dubbing. For example, in a Blu-ray movie, main characters come to Italy and meet the local people who speak Italian, then the Blu-ray will show the translation of the Italian speech in text to help audience who don’t know Italian to grasp the movie details. To help you understand the lines that are spoken in foeign languages, it’s necessary to have a backup for these Blu-rays with keeping Forced Subtitles. Below we will introduce you this term and teach you how to do this.

At first, to rip forced subtitles only from Blu-ray by yourself, the point here is to find a Blu-ray ripping tool that supports forced subtitles option. Pavube ByteCopy (Read review) is the best app I’ve tried. Besides converting Blu-ray movies with preferred subtitles, it can also allow users to create videos only with forced subtitles when ripping Blu-ray to MKV, AVI, MP4, MOV, M4V, WMV, etc, as you like. What’s more, it supports a variety of multimedia devices including PS Vita, iPad, iPhone, Kindle Fire HD, Nexus, Surface tablet and more. What’s more, if you want to keep multi-track audios and subtitles preserved, this tool can also help you. If you are running on Mac, please turn to ByteCopy for Mac. Now download it and just follow the steps below to start the Blu-ray conversion with forced subtitles only.
Preparation: Get your Blu-ray drive ready and insert Blu-ray you need to the drive. And keep networked when ripping Blu-ray.
Step 1. Load Blu-ray movies
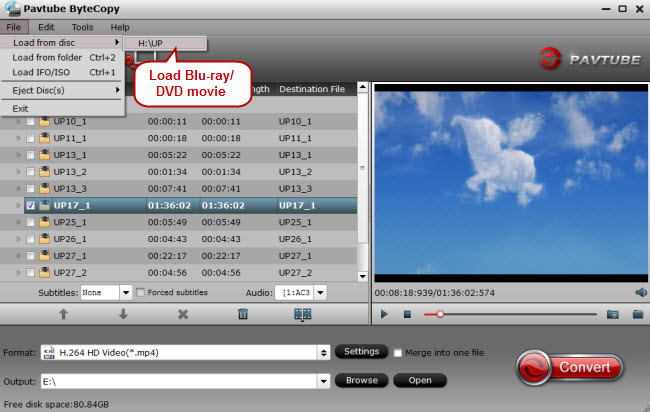
Launch ByteCopy; click the disc button to import your Blu-ray movies to the program. It will take only few seconds to rip Blu-ray. Then the software will recognize the actual main title of Blu-ray and pick it automatically. You do not need to look for the main title manually.

Step 2. Set forced subtitle
Check the disc main title and you can choose subtitle stream and audio track from the Subtitles and Audio drop-down list. To convert Blu-ray including forced subtitles, please check the “Forced Subtitles” box. When it is checked, the subtitles appear on the screen only when foreign languages (i.e. Francais) other than English(the main subtitles track you set) are spoken.
Step 3. Choose output format
Click Format bar and choose your desired format. As you see, regular video formats like AVI, MP4, WMV, FLV, MKV, MOV, etc. are provided. Besides, you can also find lots of optimized profiles for many popular portable media devices including Android devices like Nexus 7, Galaxy Tab, HTC; iDevices Apple TV, iPad and more.

Step 4. Start conversion
Click the “Convert” button and start converting Blu-ray with forced subtitles. Once the conversion finished, you can get the ripped video with the forced subtitles as you wanted. And just play your movies on portable devices anywhere. Follow the above tutorial, you can very easily rip forced subtitles only from Blu-ray, you will find it more pleasure and the outcome is more ideal.
Tip: If you are looking for a powerful all-in-one tool to convert videos, Blu-ray movies and DVDs to your Google Nexus, Kindle Fire HD, Galaxy devices, Nook HD, etc at the same saving time and effort, the program-Pavtube Video Converter Ultimate (Read review) will be a nice choice for you. If you are running a Mac OS X computer, iMedia Converter Mac is the alternative.
Continue Reading:
- Get SRT Subtitle File from Blu-ray
- Rip Blu-ray with the Right Subtitle on Windows
- Play and Watch Movie Blu-ray on Chromebook 2 offline
- Use QuickTime Player to play Blu-ray discs on Mac
- Convert VC-1 Blu-ray to WMV or ASF for playback


Recent Comments