
Blu-ray and DVD movie is becoming more and more popular, many people choose to enjoy movies with a blu-ray or dvd player, but sometimes it is not so convenient in this way, so they prefer to store BD/DVD on Drobo 5n or stream via Plex for playing directly with other portable devices or TV as above. But as we know, Blu-ray movies and DVD movies are all protected, we will need third party software to remove the protection and rip Blu-ray/DVD to the format you need. After looked up best blu ray ripper for the mac through google search and I found Pavtube BDMagic for Mac which was always considered the best by every reviewer.
After trying one other one I agree with it. With this versatile Blu-ray ripping tool, you can easily remove all kinds of Blu-ray and DVD copy-protections and convert Blu-ray/DVD to MKV on Mac, the output quality is still as vivid as original. And a lot of videos formats are supported to output, so you are able to watch them on your TV/smartphones/tablets.
Download and installed the software and experience all the functions now. If you wanna a Windows version, please go to Pavtube BDMagic.
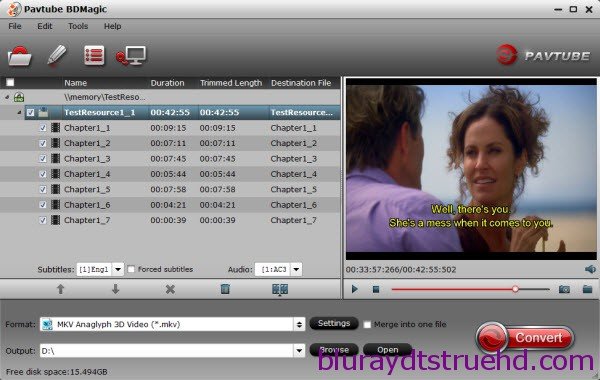
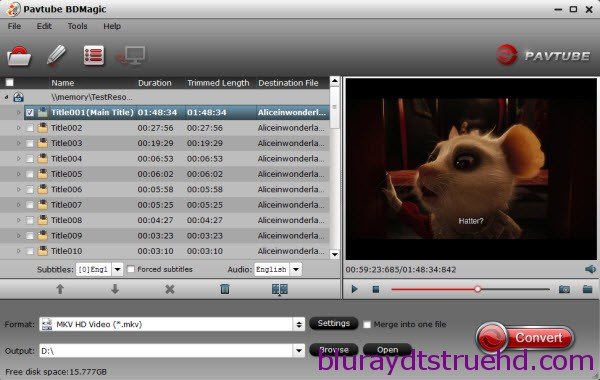
Step 1. Launch the best Blu-ray Ripper for Mac and load Blu-ray discs.
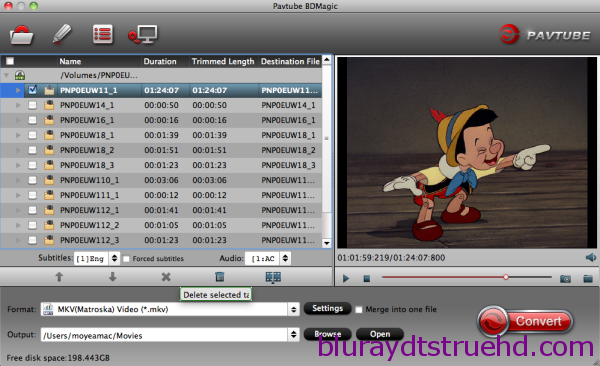
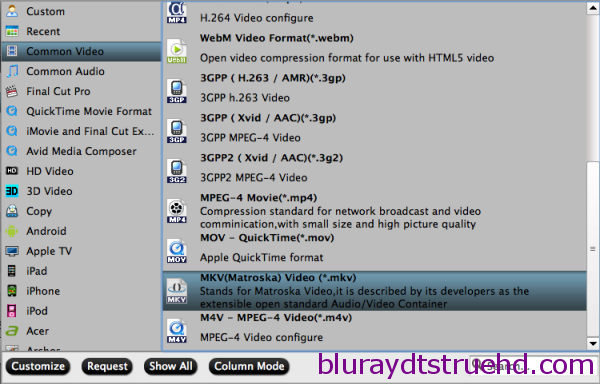
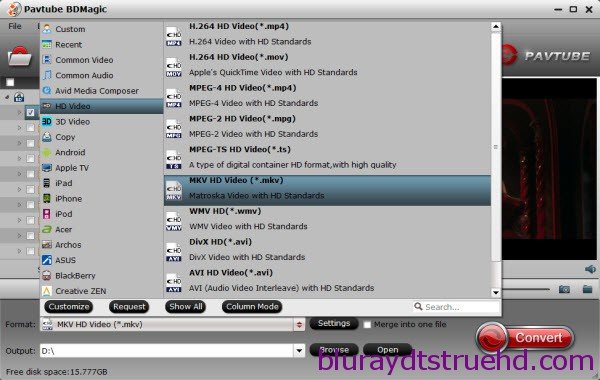
Step 2. Click “Format” to find “Common Video” catalogue, select “MKV(Matroska) Video (*.mkv)” for storing on Drobo 5n or playing on TV via Mac Mini Plex.
Also you can choose “H.264 Video(*.mp4)” for enjoying on smartphone or tables.
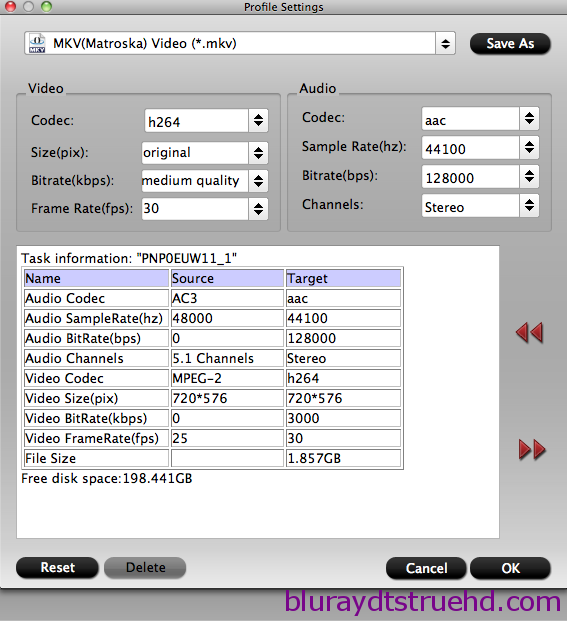
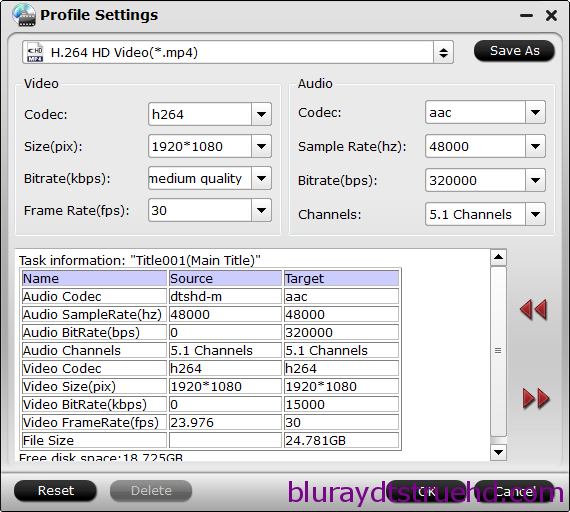
Tip: You can click settings button to adjust the output parameters, such as resolution, bitrate, frame rate, etc. For example, if you want to maintain the 5.1 audio effect, you can choose 5.1 audio in settings.
Step 3. Click “Convert” to start backing up Blu-ray to MKV, when completed, click “Open” to find the generated files.
Now transfer the converted Blu-ray/DVD movies to Drobo 5n or import them into Plex server on Mac Mini for streaming and playing on TV. Obviously, it is easy to backup blu-ray to MKV format without any audio and video out of sync issue. Have a try now!
More features of BDMagic for Mac:
And it is a fabulous way to turn Blu-ray into ISO files for Popcorn Hour C-300 Playback, backup Sabotage Blu-ray Disc to Asus O!Play Mini Plus or play Blu-ray/DVD movie via ViewSonic NMP-708.
Any Product-related questions?
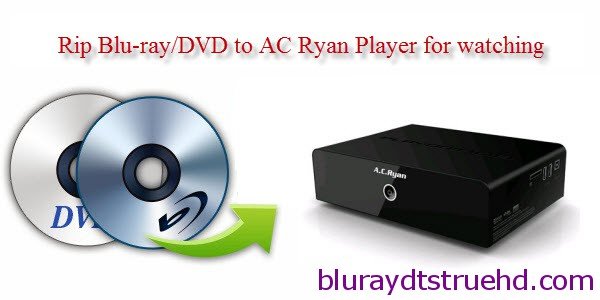
Now I have some Blu-ray, DVD discs in hand, and I’m wondering if I can get my Blu-ray, DVD content for playback on AC Ryan Player. As can be seen as above, M2TS is included in AC Ryan Player supported format list. However, according to the feedback provided by some users, AC Ryan Player does play M2TS selectively only, some are, and some are not. In purpose of solving this problem, we need to rip Blu-ray, DVD movies to AC Ryan Player supported file format. Or we need remove Blu-ray/DVD copy protection in advance.
Here we can use Pavtube ByteCopy as your good assistant which is a powerful app to convert Blu-ray/DVD movies to AC Ryan Player format easily and fast. The mac version is Pavtube ByteCopy for Mac.
Note: A Blu-ray Disc Drive is required for Blu-ray ripping.
Get ByteCopy downloaded here. Feel free to have a try. Launch Pavtube ByteCopy and click disc button to import source from Blu-ray, DVD disc.
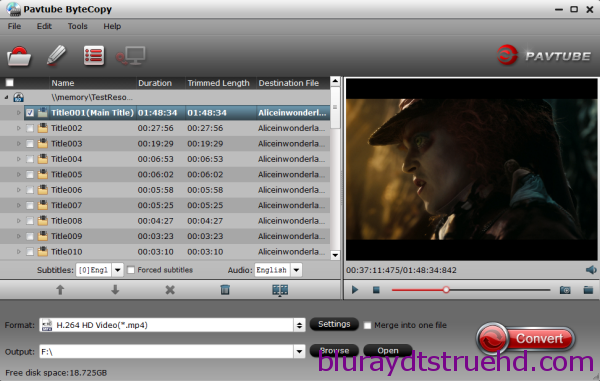
Step 2. Configure output settings
Select the Subtitle and Audio tracks for your preference.
Step 3. Set output format
According to the above-mentioned specifications, AC Ryan Player absolutely supports MP4. Just click the format bar to follow “HD Video” and “H.264 HD Video (*.mp4).” Image quality will be adequately maintained in this format.
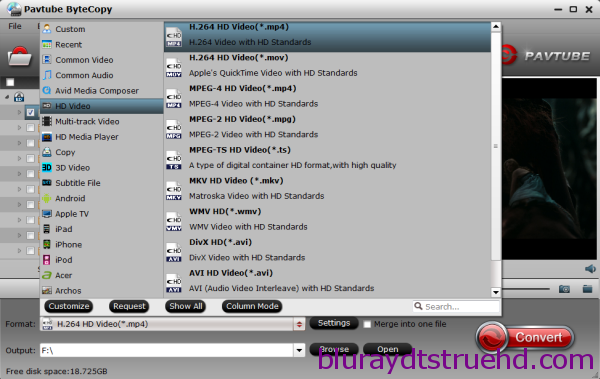
Upon selecting an output profile, advanced users can click “Settings” button by the side to configure more parameters like bit rate, frame rate, aspect ratio, etc.
Step 4. Start Ripping
Click the “Convert” button to start the Blu-ray, DVD video conversion. You just need to wait some minutes, when the conversion process finished, you can click “Open” button to get the ripped Blu-ray, DVD movie files for your AC Ryan Player.
Use a USB drive to transfer the ripped MP4 media file to AC Ryan Player, and then connect the device to your HDTV via HDMI cable. Once done, you are able to watch Blu-ray and DVD movies with AC Ryan Player with ease.
In addition, you can also enjoy Blu-ray, DVD via a KDLINKS Media Player or ViewSonic NMP-708.
More features in ByteCopy:
* You can use full Disc Copy to backup the whole Blu-ray/DVD disc with original structure including chapter markers.
* You can backup Blu-ray, DVD retaining multiple audio tracks and multiple subtitles in an MKV video without transcoding and quality loss.
P. S.
In a market filled with standalone media players, A.C.Ryan has a quality product that should make your shortlist. With many devices eschewing the hard drive in favour of streaming directly (WD TV Live) or using eSATA as an optional, fast and direct storage (Asus O!Play HDP-R1) or do include the hard drive but are much more flashy and expensive (Popcorn Hour C-200 HDMI), the AC Ryan Player seems to have found a pretty good niche for tself. Here is a review for you.
]]> http://bluraydtstruehd.com/2014/09/rip-blu-ray-dvd-to-ac-ryan-player/feed/ 0
As many Blu-ray players don’t support 3D playback, you may choose 3D Smart LED HDTV like Vizio 70″ M-Series to watch 2D/3D Blu-ray movies keeping 3D effect like me. Don’t hesitate, let’s do it. I’ll share a simple solution with you: Play a 16:9 The Avengers Blu-ray Vizio 70″ M-Series 3D Smart LED HDTV.
To be honest, without any 3D Blu-ray players in hand, you just need to get a Blu-ray ripping software like- Pavtube BDMagic, everything will be easy. I’m very pleased with its functionalities and it powerful ability to get my Blu-ray Disc ripped into compatible 3D MKV/MP4 videos for watching on Vizio 70″ M-Series HDTV. (Best 3D Blu-ray Ripper Software Review)
However you may wonder what setting I should be using that will play the 3D content without problem and how to get 16:9 display when showing my movie on HDTV. So here offers you a detailed guide. Highly recommended to give a shot!
Note:
1. Mac Blu-ray to 3D HDTV Converter for Mac users;
2. 3D effect on converted video is added by program; it may not be exactly the same as your original 3D blu-ray disc.
Click “Load files” to load blu-ray movie from BD drive, blu-ray folder or import Blu-ray ISO file directly. There’s not need to run virtual drive to mount the ISO files; Pavtube BDMagic will recognize them automatically.
Learn how to rip Blu-ray with subtitles
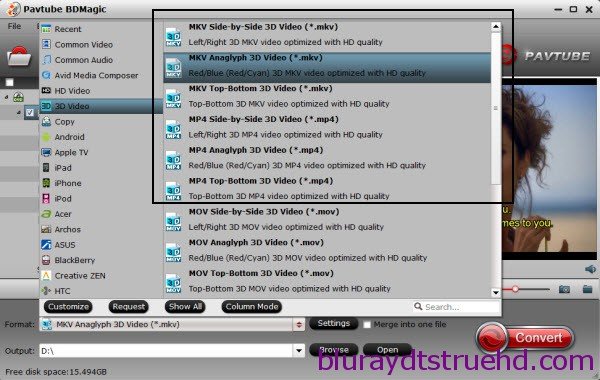
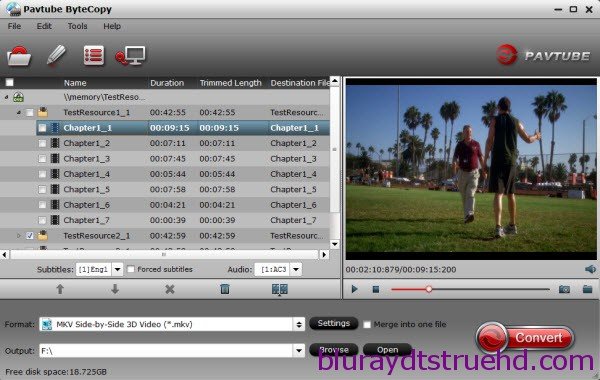
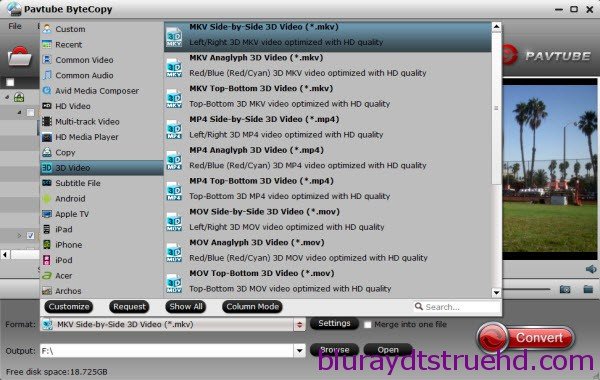
Click the “Format” bar and find “3D Video”, you will find several presets for MKV/MP4 in Side-by-Side 3D, Top-Bottom 3D and Anaglyph 3D. Usually MKV and MP4 are most recommended formats for watching on 3D Smart LED HDTV, but you still need to check your device specification to choose one accordingly.
(With BDMagic I can use the Copy > Direct Copy for backup the Blue Ray’s to get the best quality possible on my PC).
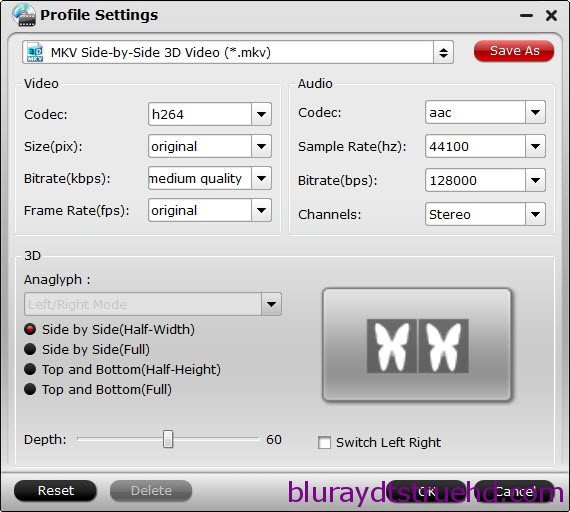
Click “Settings” to enter customize specs window; you can adjust resolution(size), bitrate, frame rate, 3D mode and depth here.
Tip 1: When you have trouble getting aligned images in saved 3D MKV/MP4 video, adjust “Depth” in Profile Settings helps make the film images aligned perfectly.
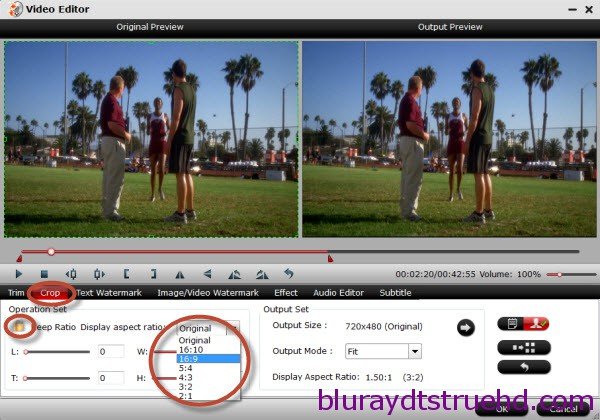
If you want to adjust aspect ratio, click the pencil-like icon and switch to “Crop” tab.
Choose Advanced mode.

Then lock the “Keep Ratio” and you can free change aspect ratio. Usually it will be set to “Original”; it would be ok to playback on TV, or you can change it to 16:9.
Hit the “Convert” button to copy your (The Avengers) Blu-ray movie to 3D MKV/MP4 video. When if finishes, click the “Open” option to locate the created 3D video and you are ready to transfer your converted 16:9 (The Avengers) Blu-ray movies to Vizio 70″ M-Series 3D Smart LED HDTV via USB flash drvie for free entertainment.
Tip 2: It is much complicated for encoding Blu-ray to 3D video because of data analyzing and processing, so the process of copying 3D video takes more than regular disc ripping.
Any Product-related questions?
And a few days before, I’ve purchased many 3D blu-ray movies, I wonder if my BenQ W1080ST projector directly play 3D blu-ray with 3D effect keeping? Is it necessary to hook up a Blu-ray player to it? I only have two options to hooking it up to a blu-ray player: S-video or that yellow video plug. No optical or DVI or HDMI plugs. I would really like to know before I go and spend a lot of money on a Blu-ray player.
From BenQ website, we learn that the W1080ST is a single chip DLP projector. It is full 1080p resolution, and it is 3D capable. It has HDMI 1.4 which allows this BenQ W1080ST projector to support Blu-ray 3D, which gives it a competitive edge over several lower cost projectors and crossover projectors.
At this moment, you just need a professional Blu-ray Converter to output high quality videos. Here, Pavtube ByteCopy allows for such a wide range of encoding with very highest quality, including 3D movies in 3D, and TrueHD audio. Pavtube gives a couple of options that makes those possible. Very quick and easy!
ByteCopy($42) + Video Converter Ultimate($65) = Only $79.9, Save $27.1
ByteCopy($42) + DVD Creater($35) = Only $44.9, Save $32.1
ByteCopy($42) + Vidpie($29) = Only $54.9, Save $16.1
ByteCopy($42) + MXF MultiMixer($45) = Only $69.9, Save $16.1
Click “Load files” to load blu-ray movie from ROM, blu-ray folder or import Blu-ray ISO file directly. There’s no need to run virtual drive to mount the ISO files; Pavtube ByteCopy will recognize them automatically.
Click the “Format” bar and find “3D video”, you will find several presets for MKV/MP4/MOV/AVI in Side-by-Side 3D, Top-Bottom 3D and Anaglyph 3D. Usually MKV and MP4 are most recommended formats, but you still need to check your device specification to choose one accordingly.
Click “Settings” to enter customize specs window; you can adjust resolution (size), bitrate, frame rate, 3D mode and depth here.
Click the big red” Convert” to start the conversion. Wait for a while and click “Open output folder” to locate the converted video easily. Now transfer your 3D movies to BenQ W1080ST projector vis USB for playback.
After that, get your computer playing the transcoded 3D videos, show the monitor on screen and the BenQ W1080ST projector will display your 3D Blu-ray with high quality. Have fun!
Any Product-related questions?
The Xbox One is a fantastic console, and with a few more updates and games it could become a must-buy for media-savvy gamers. But do you know the fact: The Xbox is not only a good game console, but also a great media player? With the rising popularity of Blu-ray, you may have a large collection of Blu-ray Discs or Blu-ray ISO files and want to use your Xbox console to play it. However, you found it impossible because it doesn’t have a built-in Blu-ray drive and Xbox 360 only support 720P and 1080P resolution in AVI, MP4, MOV, WMV, etc. video formats not including Blu-ray ISO image files.

Then is there any way to help you out? Absolutely yes. This article will show you how to convert Blu-ray(ISO) movies and play it with Xbox 360.
Now with a Blu-ray to Xbox 360 Converter – Pavtub BDMagic, which is highly acclaimed among a mass of customers for its omnipotent Blu-ray, DVD ripping ability and utmost video quality. Regardless of region code, Disney copy protection, etc, it can help you rip Blu-ray(ISO) and DVD(ISO/IFO) to Xbox friendly formats, say MPEG4, AVI, H.264, without even a hiccup. After the 1, 2, 3, easy conversion steps, you can stream your Blu-ray(ISO) over to your Xbox 360, by managing through Media Center Extender (MCE) via a home network to Xbox 360, even the latest Xbox 360 One.
Insert your Blu-ray to BD drive, and click “Load Disc” button to load Blu-ray discs. To import Blu-ray ISO files, you can click the “Load ISO/IFO” button or drag and drop the Blu-ray ISO files directly to the app.
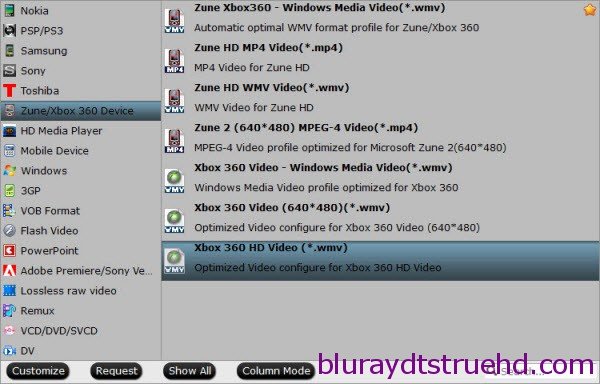
Here we select mp4 with H.264 codec for Xbox 360. Click the Format drop-down list, and select “Xbox 360 HD Video(*.wmv)” from “Zune/Xbox 360 Device” category. You can select other Xbox360 format for watching.
Tip: If you have special requirements on target video, click “Settings” to customize video size, bitrate, frame rate and sample rate.

Click the red “Convert” button to start ripping Blu-ray(ISO) to WMV for Xbox 360. When it finishes, click the “Open Output Folder” icon to quick locate the converted video.
Theoretically, there’s no way to import videos to your Xbox 360, unless you purchased it from Xbox Live. However, you can transfer the BD(ISO) movies to Xbox 360, if you:
1. Connect your Xbox 360 to a PC using Windows Media Center;
2. Copy the DVD movie media file to a USB flash drive and play it on Xbox 360.
Using any one of the methods above, you can play Blu-ray(ISO) movies on Xbox 360 free without buying videos on Xbox Live.
With Pavtube BDMagic, you can also convert Blu-ray to other media players, like AC Ryan Media Player, Asus O!Play Mini Plus, or Zune/Zune HD for playback.
Any Product-related questions?
The supported file formats of WD TV Live Plus HD are including WMV9, AVI (MPEG1/2/4, Xvid, AVC), H.264, MKV (h.264, x.264, AVC, MPEG1/2/4, VC-1), MOV (MPEG4, H.264), M2TS, TP, TS, MOV/MP4 (MPEG4, h.264), DVR-MS, VOB (unprotected or unencrypted). Here comes these questions:
The answer is YES. To keep lossless video quality for backing up Blu-ray Disc, you can either copy m2ts streams straightly from BD, or make the whole BD into an ISO image file. To keep all multiple audio and subtitle tracks, you can copy Blu-ray to lossless MKV files. And WD TV Live Plus plays Blu-ray lossless backups in different formats: ISO, BDMV, M2TS, and MKV.
Personally I will advise you to select the MKV format, because it plays lossless quality, multiple audio tracks, subtitles, and chapters. As the WD TV Live Plus will not allow you to forward movie or select a chapter to start with when playing BD ISO or m2ts clips, many WD TV uses turn to MKV format, which holds a whole movie in a single file including lossless video, multiple HD audio tracks and subtitles.
To help you get it done, MakeMKV can do this. But another issue comes up-when a Blu-ray is copied to MKV without changing anything, subtitles are not displayed when you watch the ripped Blu-ray movie (in MKV format) on HDTV, because WD TV Live Plus HD Media Player does not supports PGS subtitles in MKV container. There are two ways to get subtitles for MKV Blu-ray backup:
1. Convert the Blu-ray subtitles to something compatible with WD TV Live Plus when ripping Blu-ray to MKV. This can be done with ByteCopy. A guide here.
2. Rip the Blu-ray Disc to MKV with MakeMKV first, and extract .srt external subtitles from Blu-ray Disc later. If you don’t have the Blu-ray Disc at hand, convert .srt subtitles from MakeMKV. This takes longer time.
WD TV Live Plus supports subtitle format srt, ssa, sami, and ass. But mostly people use .srt subtitles for MKV.
1. It requires a Blu-ray Disc Drive to read BD, not an optical DVD drive.
2. It takes much more time to rip a Blu-ray than that of a DVD. DVD to MKV rip can be done in10 minutes while Blu-ray to MKV rip 1-2 hours or even longer based on the computer you use.
3. A Blu-ray movie may contain HD audio (e.g. 7.1 channels TrueHD, DTS-HD streams). Better check if AV receiver support them before ripping a Blu-ray. If not, downmix the audio when ripping Blu-ray. Info on this page may give you some hints.
4. Keep in mind that not any HD media player so far plays full role of a Blu-ray Disc player- they may decodes video, audio, subtitles and recognize the chapter mark, but none support full BD navigation- you lose menus when playing Blu-ray rips with HD media player.
5. Personally I recommend ByteCopy for ripping Blu-ray and DVD to HD media player, cause it’s very flexible with various backup solutions.
[Review] MakeMKV vs ByteCopy vs DVDfab
[Knowledge] The advantages of MKV format for Blu-ray Ripping
[Solution] Selecting a Blu-ray to MKV Ripper
Any Product-related questions?
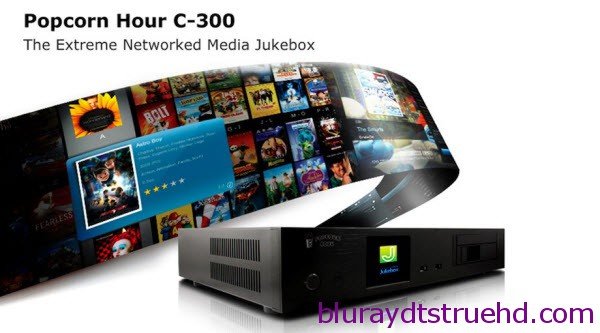
To make it easy to get C-300 have license to support Blu-ray playback, you have to remove the Blu-ray copy-protections and rip Blu-ray to HDD first. There are different ways for backing up Blu-ray- you can rip a Blu-ray to BDMV, BD ISO, MKV or .m2ts streams without degrading the Blu-ray quality. The Popcorn Hour C-300 are capable of playing all of them. Actually the C-300 is a very good BDMV media player. And they perform even better when playing MKV files.
Pavtube ByteCopy and ImgBurn
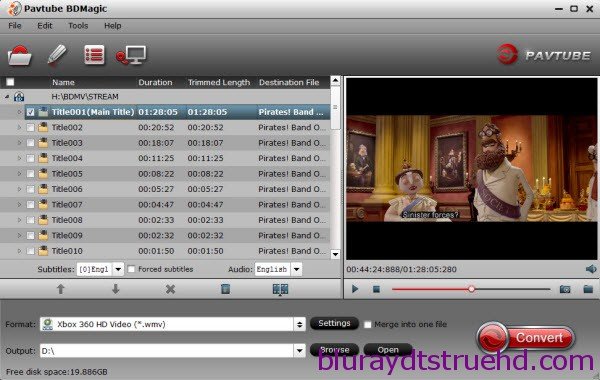
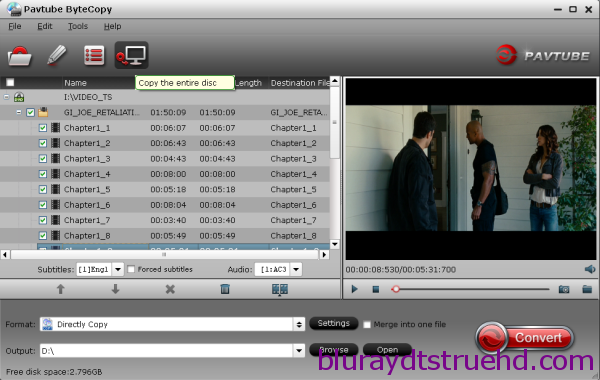
Step 1. Just connect BD drive to your computer, and place in source Blu-ray Disc. Run Pavtube Blu-Ray Ripper software. Click “BD/DVD ROM” to import Blu-ray movie.
Step 2. When the movie is loaded, click “Full Disk Copy” button to make a quick and full copy of the Blu-ray movie. Once it’s finished you’ll get two directories, one is BDMV and the other CERTIFICATE.
A detailed guide is provided in a previous post. Click here to learn how to make Blu-ray ISO for Popcorn Hour C-300 playback.
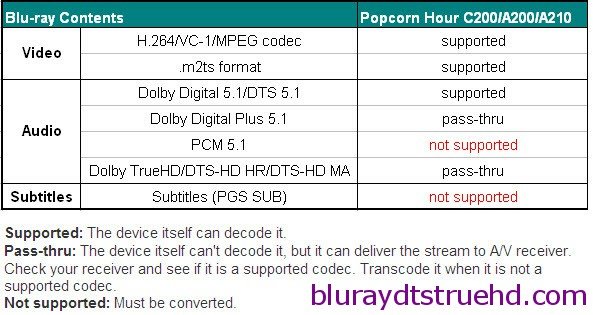
1. The PopCorn Hour C-300 does not play Blu-ray menus (not yet, but probably will). So when playing Blu-ray ISO, the C-300 plays the MAIN FEATURE ONLY. If you copy Blu-ray to .m2ts streams, you can copy the main feature only, leaving out menus and extras. This will save some storage for you.
2. As there is no equivalent ImgBurn for Mac, if you want to turn Blu-ray to Popcorn Hour C-300 playable videos on Mac, just store your Blu-ray into BDMV folder on Mac or backup Blu-ray to m2ts on Mac or copy Blu-ray to lossless mkv on Mac.
3. The PopCorn Hour C-300 does not play the Blu-ray subtitles (PGS encoded .sup subtitles) either. So you’ll have somee troubles understanding the lines when a foreign language is spoken- like Navi language in Avatar Blu-ray movie. If you are interested in playing Blu-ray movie subtitles with PopCorn Hour C-300, refer to the article here.
4. A Blu-ray movie can contain Dolby Digital 5.1, DTS 5.1, PCM 5.1, Dolby True HD 7.1, DTS-HD 6.1/7.1 audio. So better check out your A/V sound system before you rip a Blu-ray and make sure the audio can be played correctly. It’s not a plesurable thing when you play a ripped Blu-ray without hearing sound from speakers. Make sure your AV receiver decodes the audio before ripping, or convert the Blu-ray audio to something that can be handled, e.g. AC-3 5.1 audio. Many Blu-ray rippers can encode Blu-ray. If you’d like to trans-code audio without changing the orginal video, Pavtube ByteCopy is your choice.
IMPORTANT: THIS WORK ONLY 5 TIMES IN EACH OF THE SETUPS!
BD Region Setting
BD Region Codes
Region A
Region B
Region C
Source: Wikipedia
Any Product-related questions?
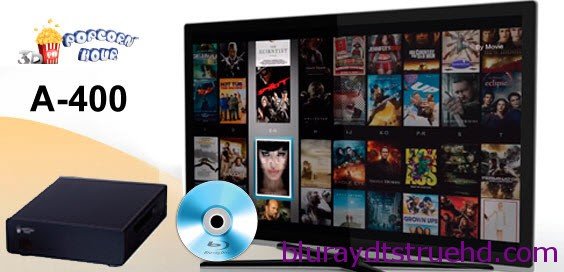
However, few people have luck with Blu-ray subtitles when playing ripped Blu-ray movies with a Popcorn Hour A-400. This is because the Blu-ray .sup subtitles is not a supported format for PCH A-400. Blu-ray Discs use PGS encoded .sup subtitles. PGS is graphical image subtitles totally different with the text based subtitles (e.g. srt), and must be played in a different way. So far Sybas has not added support to Blu-ray PGS subtitles for Popcorn Hour A-400. To get Blu-ray movie subtitles displayed properly, there are two ways to go:
Either) Embed the subtitles into the movie when ripping a Blu-ray to Popcorn Hour A-400 This would make the subtitles a part of the image- you will always have the subtitles on the screen and can not turn it off. And of course, you get one subtitles track. Here is a guide to follow.
Or) Convert the Blu-ray PGS subtitles to Popcorn Hour A-400 playable subtitles format, like SRT and VOBSUB when ripping Blu-ray to MKV format (see why MKV). This would allows you to keep multiple subtitles- and audio tracks (including TrueHD and DTS-HD). Find a guide below:
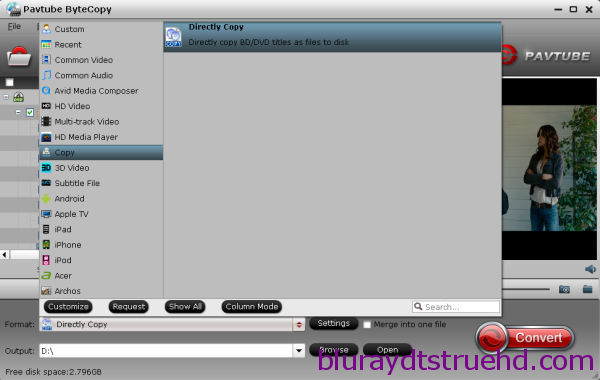
A Windows PC running Pavtube ByteCopy, with accessible Blu-ray Disc drive. I’m just starting to look at ripping my Blu-ray collection to Popcorn Hour (A400) and I don’t want to compress the BD contents for Popcorn Hour in a lossy way. So Pavtube ByteCopy provides me a backup Blu-ray to lossless MKV preserving all the multiple audio and subtitle tracks as well as chapter markers. Also, I can convert Blu-ray movie on Android/Apple/Windows Device with it.
You are free to try free trial version (Pavtube ByteCopy for Mac is for Mac users).
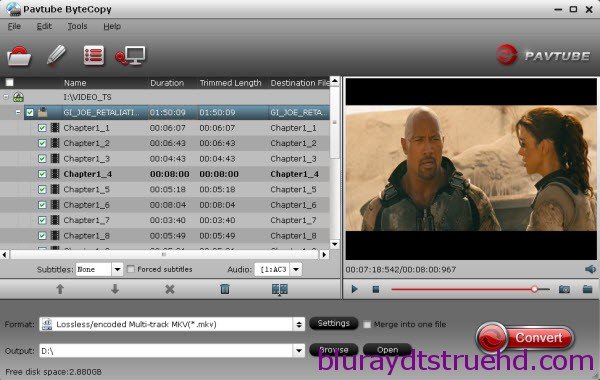
Now let me show you how to backup Blu-ray to lossless MKV with chapter markers no recoding in 3 steps.
Run Pavtube ByteCopy, and click “Load Disc” button to import movie files from copy-protected Blu-ray Disc.
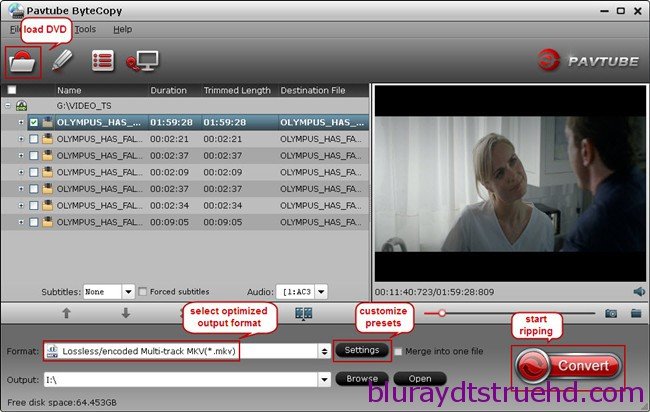
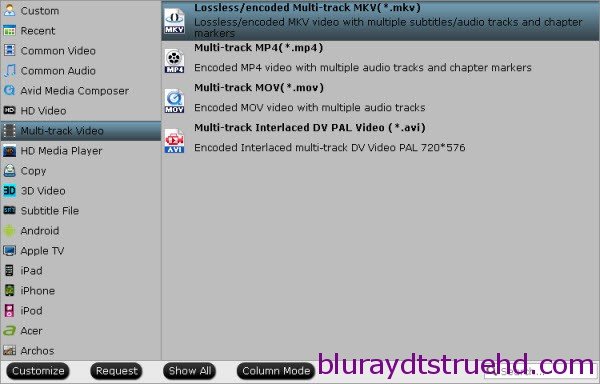
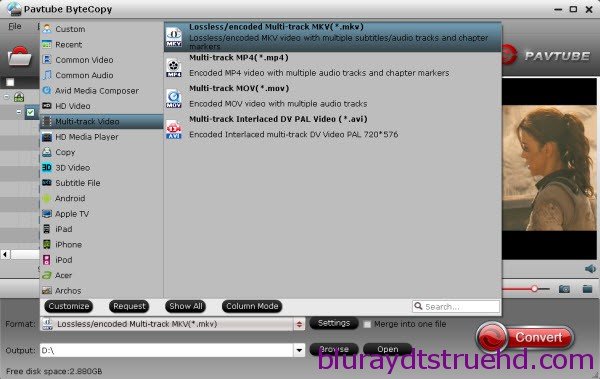
Under “Format” menu, there are lots of video formats. Go to find “Multi-track Video” option and choose “Lossless/encoded multi-track MKV (* mkv)” because it will contain chapter markers in output MKV.
Tips:
a. If you want to convert Blu-ray to other video formats or portable devices, just choose the video format you need or select portable devices in the dropdown list.
b. Before conversion, you can choose output audio tracks and subtitles to keep. Simply tick off the audio and subtitles you don’t want.
Click big “Convert” button to start conversion. It won’t take much time for conversion and then you will get lossless MKV once completed. Hit “Open” button you will go to location of generated files.
Learn more details about how to rip Blu-ray disc to MKV and keep chapter markers and then go to fully enjoy your favorite Blu-ray whenever you wanna.
when this profile is applied, the loaded Blu-ray movie will be converted into to H.264 MKV with Dolby Digital 5.1 audio and vobsub (DVD subtitles format, which is supported by PCH A-400 boxes).
: Back to Step 3. Click “Settings”, and tick off the “Encode” box of video and audio streams. This will allow you to keep the original video and audio streams.
: Likewise click “Settings”. Set lower video bitrate to compress Blu-ray to MKV. To compress a 90min Blu-ray movie to DVD quality (4-6GB), set 5000kbps. For down converting Blu-ray movies on an 46’ HDTV (8-12GB), set 8000kbps to 10000kbps. Read a guide here.
Any Product-related questions?
In fact, Asus O! Play Mini Plus is a compact media player which is capable of playing most of the video and audio in various formats like include MPEG1/2/4, H264, VC-1 and RMVB, with all the popular extensions such as AVI, ASF, DAT, FLV, MKV, M2TS, MP4, MOV, M4V, RM, TS, TP, TRP, VOB/ISO/IFO, WMV, and xVid/DivX, etc. To easily watch Sabotage Blu-ray movies on HDTV or TV by using ASUS O!Play MINI or on any other TV players, you have to rip and convert Blu-ray to for ASUS O!Play MINI player firstly.
Here Pavtube BDMagic is a professional Blu-ray converter to rip Sabotage Blu-ray Disc to Asus O!Play Mini Plus supported formats like MP4 AVI MPEG-2, then you can play Blu-ray movies without problems. Besides, this best Blu-ray ripper supports AMD APP and NVIDIA CUDA acceleration technology, so it will rip Blu-ray to ASUS O!Play MINI player at a fast speed. What’s more, as O!Play Mini Plus supports Dolby TrueHD and takes full advantage of Blu-ray sound quality with 7.1-channel surround, BDMagic is able to read TureHD audio and DTS Master Audio, and output them as 7.1 channel for watching.
Note: A blu-ray drive is needed before Blu-ray conversion.
Click “Load file” icon on the top left to load the Blu-ray disc.
Under “Format” menu, there are lots of video formats. Go to find “HD Video” option and choose “MKV HD Video (*.mkv)”, I find it is the best format for playing in Asus O!Play Mini Plus after severial trials.
Tips:
a. To keep TrueHD 7.1 audio, you can only choose Common Video > WMV3(WMV9)(*.wmv) as the output format, for it provides the 7.1 audio channels for you. But make sure the original BD disc does contain Dolby TrueHD audio, otherwise you still can’t get Dolby TrueHD 7.1 audio saved.
b. If you want to convert Blu-ray to other video formats for streaming to portable devices, just choose the video format you need or select portable devices in the dropdown list.
If you are not satisfied with default specs, then click “Settings” to enter Profiles Settings windows; here you can customize video frame rate, bitrate,size and other settings freely.
Note: If you want to trim, crop, editaudio/subtitles or adjust aspect ratio, click the pencil-like icon and switchto “Crop” tab. Choose Advanced mode, lock the “Keep Ratio” and you can free change aspect ratio. Usually it will be set to “Original”, you can change it to 16:9 when playing on HDTV, or select other options.
Click big “Convert” button to start conversion. It won’t take much time for conversion and then you will get MKV HD once completed. Hit “Open” button you will go to location of generated files.
Then transfer the converted mp4 files for ASUS O!Play Mini Plus media player and streaming to other devices or HDTV for unlimited movie enjoyment.
* Full Disc Copy can 1:1 backup the whole Blu-ray/DVD disc with original structure including chapter markers.
* Directly Copy will backup 100% intact Blu-ray/DVD main movie with all the multiple tracks excluding menu.
* Rip and Convert latest Blu-ray/DVD to various video formats for playback or editing, edit the video before conversion including trim, crop, effect, etc, add *sst and *ass subtitle into video part and so on.
* With BDMagic, you can also rip Blu-ray, DVD discs to VLC Media Player, WD TV players, Dune HD Media Player, ViewSonic NMP-708, etc.
AutoPlay – Plug-n-play videos
The exclusive AutoPlay functions allows you to plug and play videos via USB hard drive or SD/MMC/MS/xD card without any additional settings needed
Step 1: Create an “AutoPlay” folder in your storage device
Step 2: Copy video files into the new AutoPlay folder
Step 3: Plug the USB hard drive or SD/MMC/MS/xD card to O!Play Mini Plus
Step 4: Videos will play automatically on your HDTV
O!MediaShare – Cable-free media streaming from your smartphone/tablet to a HDTV
Download the application from Apple App Store or Android Market. You can stream your favorite media files from your smartphones and tablets and display the content on a HDTV via O!MediaShare. You can also stream online content such as Facebook albums and YouTube videos to the O!Play Mini Plus.
Any Product-related questions?
If you want to enjoy Blu-ray/DVD movies with WD TV player, the best way is to backup BD/DVD to lossless MKV which is supported by WD TV player with with all languages, subtitle tracks and chapter info keeping. In this case, a powerful and easy-to-use Blu-ray/DVD to MKV Converter is necessary. It can help you to retain all multiple audio and subtitle tracks in MKV files. However, Some WD TV users has difficulty in playing MKV files with DTS audio because some WD TV player can not support DTS sound, like WD TV Mini Media Player. Don’t worry, Pavtube ByteCopy support to select audio codec for every audio tracks in MKV. You can choose to remove unnecessary DTS audio or convert DTS to AC3 codec for all WD TV box can decode AC3 5.1. Free download and install it: Pavtube ByteCopy and ByteCopy for Mac.
See also: Can WD TV Live Plus HD Media Player play Blu-ray and DVD ISO
First of all, insert your Blu-ray to Blu-ray drive and DVD to DVD-ROM. Keep networked. Now it’s time to import Blu-ray/DVD into the software after launching it. Click “Load files” icon to choose Blu-ray/DVD source for importing.
In the dropdown list of Format menu, you can find several MKV options for output. Here we recommend “Lossless/encoded Multi-track MKV (* mkv)” under “Multi-track Video” catalogue. Because it will save multiple video, audio and subtitle tracks form original Blu-ray/DVD in output MKV and you won’t suffer any quality loss.
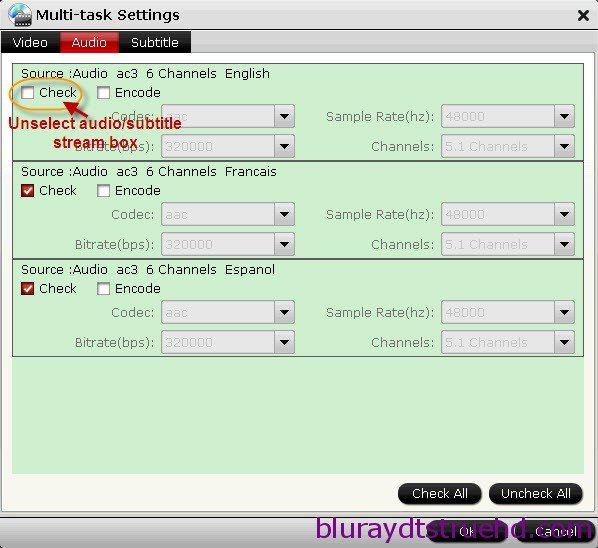
Click “Settings” button on the main interface; you are brought to Multi-task Settings. Here detailed parameters of multiple audio and subtitle tracks are listed and you can change any of them at will.
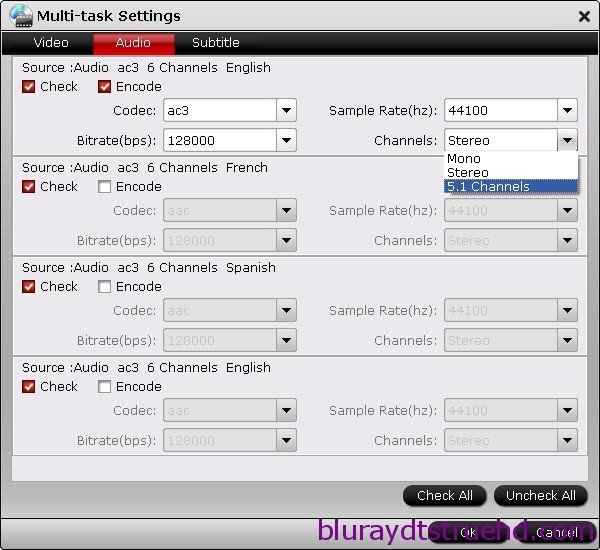
In default system setting, every track is checked for lossless MKV output. If you want to remove one of them, just uncheck it from the list. Check “Encode” option, you can change audio parameters like codec, channels according to your needs. In this way, if you don’t like DTS audio, you can choose to remove it or convert to AC3 here.
Note: If you change audio parameters under “Encode” option, you will get a encoded multi-track MKV file, not lossless multi-track MKV. Recoding Blu-ray/DVD to MKV will take a little more time for conversion than lossless output.
When everything is ready, you can click “Convert” button to start converting Blu-ray/DVD to lossless MKV with AC3 5.1/DTS 5.1 audio for WD TV player. Once finished, go to “Open” the generated MKV files.
Now it is time to enjoy your favorite Blu-ray/DVD movies with WD TV player.
Amazing news! We have various Money Saving Software Bundles, which will provide big special sale. Go to find what you like.
ByteCopy($42) + Video Converter Ultimate($65) = Only $79.9, Save $27.1
ByteCopy($42) + DVD Creater($35) = Only $44.9, Save $32.1
By default, AAC/Dolby Digital 5.1 audio will be decoded in 2 channels and outputted to left and right speakers only when playing MKV and other videos with WD TV players. To enjoy surround sound, you need to connect your WD TV box to A/V receiver via S/PDIF port (using an optical cable) or HDMI output, and set “Digital” audio output using remote control following these steps:
1) Press Home, then select the “Settings”icon.
2) Press down arrow and select “Audio/Video” category, and then press Enter.
3) Find and select “Digital” from the category so as to enable 5.1 surround sound outputs. If you are using HDMI for video and a S/PDIF connection to output 5.1 surround sound.
Any Product-related questions?